This project all started with MASKS! During 2020, I made well over a 1000 masks and gave them away! I never charged a penny for any of them! They were given away to friends, customers, and even several strangers on the street and the shopping centers! It made me feel good to give something away that everyone needed. Now that it’s time for the masks to go away, I felt we were left without the wonderful colors. Now we can all share in the brightly colored shirts that remind us of what the 70’s was all about! It’s rather funny though. Not everyone likes ‘Tie Dye’, but the younger crowd certainly does! I’ve had so many friends and customers tell me that their kids took their dyed masks I had given them. Now, the kids are stealing the shirts too! It’s time to order them one in their size!
This is the ‘wordy’ part of my website. However it’s full of helpful information to answer your questions. It can also give you plenty of insight on doing some tie dye of your own. As always, we recommend good quality gloves when doing this, unless you like your hands being discolored from all the dye.
Shirt manufacturers: We prefer using Hanes Beefy Tee shirts. These are medium weight shirts, good quality and construction. Some have tags, others have printed tags (its always unknown which we will receive). We also have Pro Club Heavyweight shirts. These are not as thick as a sweatshirt, but heavier than a standard tee. These are great for those who are always on the cold side, or someone who just want a little thickness on a cool night. They are also very durable, much more so than a standard tee shirt. Then of course, there are the regular undershirt tee’s that are very lightweight and comfortable.
Some shirts can take up to a week to arrive prior to processing. Be sure to keep that in mind when ordering a custom shirt.
The samples you see here were produced by us. Ideas come from the internet, especially YouTube! Gotta love that free university for higher education!
Sizes available:
Most of what we carry are Hanes T shirts. We like to get the Beefy T version, but have also received a few other types. We also have Heavyweight shirts for those who prefer a thicker shirt for those cool nights. They hold up longer and the colors are very bright! Not all sizes are available in Beefy T version.
Sizes in stock at most times… however this will vary from time to time.
White shirts: M, L, XL, 2XL. Limited quantities: 2XLT, 3XL, 4XL (Hanes), XLT, 2XL (Heavyweight)
Black shirts: XL, 2XL. Limited quantities: 6XL (only one left!)
Any other sizes must be ordered.
NOTE: The TALL sizes are about 3 inches longer. Technically an XLT is the same size as a 2XL shirt with slightly broader shoulders. The TALL shirts are recommended for those who want to tuck it in (or cover a plumber’s crack). Not all sizes are available in tall versions. We generally recommend getting one size larger because cotton does shrink. These are all washed in cold and dried on HIGH to maximize any shrinkage before the customer receives them.
Available Dye Colors:
Jet Black
Midnight Blue (dark blue)
Bright Blue
Turquoise (light blue)
Emerald Green (darker green)
Bright Green
Lemon Yellow
Fire Engine Red
Raspberry (a cool red… my personal favorite)
Fuchsia (a purple-ish red)
Deep Purple
Brilliant Orange
Plus… Limited quantity of other shades of blue (robin’s egg, lilac, etc.)
Other colors may be available upon request and would need to be ordered. An additional charge my be required.
The process:
Liquid dye: This is when we use mixed liquid colors to apply directly to the fabric. This usually allows for denser colors and richer hues. Black is a good example. It will come out very black!

Ice dye: The shirts are folded, placed on a rack and covered with dye. Ice is placed on top. The ice slowly melts distributing the dye through the shirt. This produces a variety of effects on the colors and sometimes can look washed out after the first wash. Ice on top of the ice will certainly produce a ‘water color’ type of painting.


Marble Dye: This is something new I’ve seen and tried. It’s a method using a white shirt, shaving cream and dye to apply colors to the shirt. It produces a marbled effect and no two are exactly alike. Various colors can be used, but darker black, blues or reds are recommended. It will produce a shirt with a light (mostly white) background covered with swirling lines both front and back. This cannot be done on a black shirt. Technically, the dye is ‘printed’ on the white shirt.


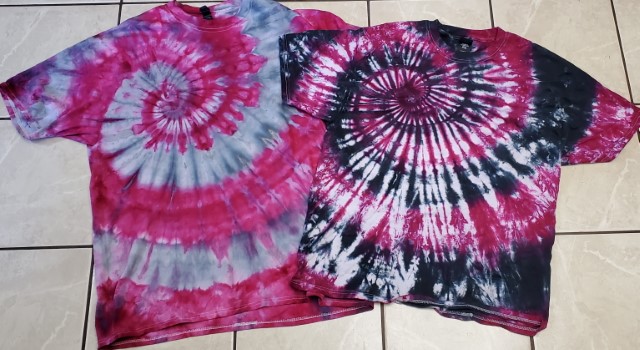
Differences between Ice Dye and Liquid Dye: Below is an example of the same colors being applied on two different shirts. One was made using Ice Dye technique. The other was done with Liquid Dye. As you can see, the ice version does look washed out, or mellowed. Where as the liquid version is very bright, bold and has intense color.
Before & After Wash


For white shirts, they are all soaked in Soda Ash prior to dying. This is to help the colors bond to the cotton fabric. It makes the colors stay and not rinse out in the first wash.
For black shirts, it’s a multi-step process. Shirts will be folded and bleached (using either bleach or a whitening solution, or both). Neutralized, Rinsed, soaked in soda ash and then dyed. These can take an extra day or two.
Storm Shirts: These are unique and never the same twice. We fold the shirt (usually spiral or other patterns) and cover with powdered dye. These are set out in the rain for up to 24 hours. The rain naturally allows the dye to soak through the fabric and deposit a dense color pattern. If the weather doesn’t cooperate, that’s when the garden hose comes in to play.
All shirts are washed and laundered after the processing is complete. We use fabric softener in every wash. Shirts are packaged individually and sold.
NOTE: No two shirts are ever 100% identical. There will always be some slight differences. It’s always possible that a spot of another color may be accidentally applied to a shirt during the process. This is unavoidable, but we do try to keep quality at a high standard.
Prices:
$25 for pre-made shirts. These are ones that have already been made and are ready for wearing immediately!
$30 for custom shirts (up to 2XL sizes)
$35 (and up) for custom shirts (over 2XL sizes) … because the shirts cost more!
Patterns available:
Please see our examples and refer to the design mentioned. We can also try other designs found on YouTube, but cannot guarantee exact results. For example, the Geode shirts have not come out properly and are not recommended. Storm shirts vary in a big way. Some come out dark, some come out looking like a galaxy or nebula. They always vary and appear very random.
Have you seen something you’d like us to try and make? Feel free to contact me and I’ll review it to see if its possible. We can also tie-dye other things. So far, I have dyed shirts, masks, and skirts. They need to be close to 100% cotton in order to dye properly. We could probably tie-dye a pair of “Tighty Whities”, but haven’t been asked yet.
Recommendations:
- Don’t over do it with color. Usually 2 or 3 colors are good enough. There will be some natural blending (and some unnatural as well). A good quality shirts with three colors (red, blue and yellow) can produce a shirt with up to 6 colors (by mixing to produce purple, orange and green). Yellow and Purple look good next to each other, but when they mix, it turns brown. The same for several other color blends like orange and purple, which can look awesome on a shirt as long as they don’t bleed.
- Simple looks best. A simple two color spiral can have some amazing results.
- Colors can (and do) wash out during the first wash. If you are wanting something dark, please mention it when ordering. What starts out looking like black can turn grey in the wash. In those cases where dark black is requested, we will do a liquid dye to darken the colors rather than use dry dye.
- We can bleach other color shirts for processing, but the results may vary. Black shirts when bleached do not turn white, they turn a yellow-orange color. It must be light enough to take the colors. Blending may or may not come out properly. Testing may be required for some fabrics. Some shirt brands just don’t bleach out like others, so it’s hit or miss.
Are you wanting to try this yourself at home?
First, I’d recommend getting a few things. You will need good quality gloves. You can pick up a Tie-Dye kit from Amazon which has the basics to get you started. There are several available. Personally, I like the large 6 pack bottles for beginners. These kits do some with a few cheap gloves and rubber bands to get your going, however you’re probably going to want more.
As for the shirt. VERY IMPORTANT! Make sure it’s 100% cotton for best results. Anything else won’t look so pretty. A good recommendation is to also TURN YOUR SHIRT INSIDE OUT! This will make the shirt look better at the end.
You will need a good clean table, or a drop cloth. Make space available and wear something you don’t mind getting a little dye on. It’s a messy job. Got kids doing this? I’d recommend an apron for the kids to wear, and gloves! This dye does not come off easy.
Start off soaking the shirt in SODA ASH. This is a mix of about a cup of soda ash to a gallon of water. Use warm water to help it dissolve quicker. Mix it up good so you don’t have clumps. You can use your hand, but it is a little caustic, so it could irritate your skin. Just wash it off with soap and water. NOTE: It will leave a white powder on things it gets on, but it’s easily washed up. Soak your shirts for about 30 minutes. Squeeze out the excess liquid. Wring it out good. You don’t want it dripping wet, just nice and damp.
Decide on your fold pattern. This is where the magic happens. Your design depends on this step. If you want a spiral, spread out the shirt and start twisting an area. Keep the shirt as flat as possible and twist it up tightly. Hold the twist tight by using six or eight rubber bands. The spiral should be even across the shirt.
If you decide to do something else, check out YouTube for ideas. There are plenty of videos out there showing you the steps. I think the spiral is one of the coolest looking patterns (and most common).
I recommend using a rack over old newspaper. Place your shirt on a clean rack (even a speck of color will bleed into the shirt). Space your projects apart so they don’t touch.
Apply your dye in sections. Keeping in mind which colors look best next to each other. The colors will bleed, so don’t mix up colors that won’t blend well. A nice blue and yellow will make a remarkable shirt with a bit of green. Blue and Red makes a purple. Red and Yellow makes orange. Overlapping the colors a little bit will give you that ‘extra’ color.
Using gloves, flip the shirt over and do the same on the back side. Now … heres’ a hint! You can produce some awesome looking stuff by shifting the colors a little bit. Where you had blue on the front side, try red on the back side in the same area. This will produce another variant in your final product. If you want just the boldness, stick with the same colors on both sides in the same pattern.
Now this is where you MUST LEARN PATIENCE! Leave the shirt to sit for up to 24 hours. Some recommend putting it in a bag to keep it moist. I’ve never had any of mine dry out in just a day, unless it was sitting in the sun. I just leave them out, and check on them from time to time. There really is nothing to do, but the longer you leave it, the bolder the colors will be. I think 48 hours is a bit too much, besides… I don’t have the patience to wait THAT long! I’m always anxious to see how it will turn out.
When it’s rinse time, you still have to be patient. Use gloves! Put the shirt (still banded up) under running water. Keep going until it runs mostly clear. It can take up to 10 minutes or more. Remove the rubber bands and rinse some more. Get as much of the dye out as possible. Squeeze out the excess water and set it aside. After rinsing all of your projects, it’s time to run them through the wash.
There are many who say “Use hot water”, which may be fine for some dyes. I prefer to use cold water. Remember … colors bleed! To help prevent colors from bleeding from one shirt to another, use Dawn Dishwashing liquid in the wash. Even a washer that is HE can handle a little Dawn soap. Don’t use a lot. Just squirt some on the shirts before they are washed. I also add Downy to mine to soften the shirt. It seemed the dye can leave a bit of a rough feeling on the fabric, so it most definitely helps. Dry it as usual. I prefer HIGH HEAT to make it shrink as much as it can on that first wash. Cotton shrinks, so keep that in mind.
Now you’ve got a shirt that has been dyed and ready to wear! Wear it proudly and remember you made it yourself. It may look similar to ones you’ve seen at the store, but it is uniquely yours! And most of all … have fun doing it! Let’s hope you don’t get addicted like I did and end up with over 50 shirts in your closet! 🙂